As a teenager, I use to never cover dark under eye circles. In fact, it’s really only been in the last two or three years that I learned what concealer even was, which at 27 years old, I’m a little embarrassed to admit.
So today, if you’re someone who isn’t covering her dark under eye circles, or you’re just not sure how to, I’m going to show you exactly what you need to do in order to get those bright, sparkly eyes that you’ve been dreaming of.
Trust me, you may not think concealer makes a difference, but once you start using it, you’ll see what it can do for you, and you’ll never go back to a makeup routine without it.
Also, I should mention that you don’t have to do all these things to achieve bright, sparkly eyes. On a regular day, I’ll just simply cover my dark under eye circles with some basic concealer, and call it a day, but if you’re headed out for a night on the town, or you have an event where you want to look top notch, these tips are going to come in handy.
Okay, you ready?
Follow these 5 tips to cover your dark under eye circles:
Note: there are a couple affiliate links used in this article, meaning I make a small commission if you purchase through one of my links, at no extra cost to you. I only provided links to products I both use and love 🙂
1. Moisturizing is Key!
Hopefully, by now, we all know that moisturizing our face is super important for our overall skincare (check out this article if you need a refresher on how to keep skin hydrated), but when you’re slathering on your fave moisturizer, there’s a good chance you’re not paying specific attention to your under eye area.
Spoiler alert: this is a mistake, and you need to be paying attention to this part of your face when moisturizing.
Even if tend to land on the more oily end of the spectrum, use a water-based moisturizer, and concentrate on gently massaging the under-eye with the moisturizer.
Just keep in mind that this is a very thin, sensitive part of your skin, so there’s no need to scrub. Simply let your fingers glide over the skin, and with continued use, this will help in making your makeup go on smoother and prevent creasing.
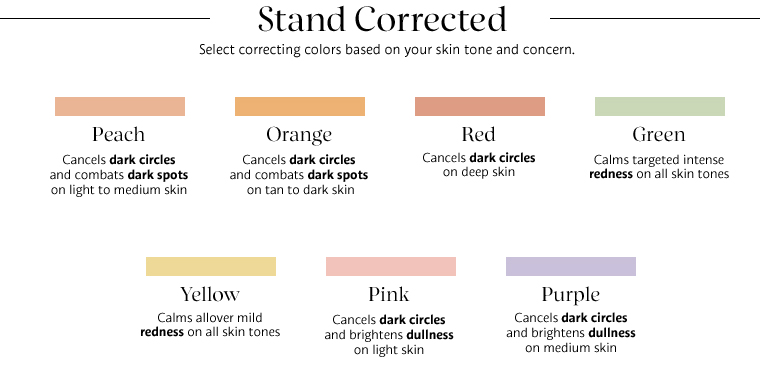
2. Try Out Color Correcting
Image via Sephora
Personally, I don’t do a lot of color correcting, but if you’re someone who really struggles with dark under eye circles, I suggest getting familiar with the concept of color correction.
You can do a bit of research in order to find the best color correction for your skin tone, but in general, you want to pick something that is the exact opposite color of your dark circles.
Take a look at the above image to see what kind of color correcting is best suited for you. Just remember, you’ll still be applying your regular concealer over top of this, so just a little color correcting specifically applied to the dark area is all you’ll need.
3. Conceal, Conceal, Conceal
Here’s where my teenage self could have used some help.
Once you find a concealer you love, it will become an absolute game changer in your makeup routine.
Personally, I use to always rely on my foundation to cover up my pesky dark under eye circles, but, in order to properly cover darkness, you need a slightly thicker product that is lighter than your regular foundation. Again, I personally really enjoy the NARS Radiant Creamy Concealer, but I’ve also used the Maybelline Fit Me Concealer, which I love as a more affordable option.
To apply, make a triangular shape under your eyes with the concealer to further enhance brightness.
4. It’s Time To Set Your Under Eye
Once you’ve applied your concealer, it’s time to set your under eye.
This isn’t something I do on a daily basis, but if you really want to get that bright look, this is a step you shouldn’t skip. Not to mention, setting your under eye is what keeps your concealer lasting all day long, and will prevent creasing.
To apply, lightly brush a translucent powder under your eye. Make sure not to harshly brush. It’s important to never apply anything on your under eye roughly since this is such a sensitive part of skin. It’s also important to be gentle to ensure you don’t move any of the product underneath.
Currently, I use the Hourglass Ambient Lighting Powder. This is a more pricey product that I asked for for Christmas, but oh my goodness, does it work miracles! Finely milled and oh-so-bright, this product is going to make your eyes pop! Put this on your wish-list ASAP.
For other options that might be more affordable…
5. Try Using a Setting Spray
And last but not least, if you’re not already using a setting spray, it may be time to give it a try.
By doing so, you’ll be ensuring the concealer is really locked into place. It will also remove any powderiness created by setting your under eye in the previous step.
Not sure how to apply setting spray to your under eye? No worries. I’ve got your back.
Simply spray the setting spray onto a makeup sponge, like a beauty blender, and then lightly dab the sponge onto your under eye. This will ensure you don’t put too much setting spray, while also preventing you from spraying any product too close to your eyes, which you definitely want to avoid
Personally, I am currently using this NYX setting spray, which is a great option if you’re looking for something that gets the job done, but is on the more affordable end of the spectrum.
And there you have it: some quick and simple tips to ensure you’re always looking your absolute best, with bright, sparkly eyes.
‘Cause seriously, I don’t know about you guys, but even when I’m running on pure caffeine and I haven’t got my proper 8 hours of sleep, I’m still all about looking lively and bright.
Who’s with me?!
Give these tips a try, and let me know how it goes!
Oh, and if you found these tips helpful, please feel free to share this image with your Pinterest followers.


Leave a Reply